Saturday, February 17, 2024

Mod Podged Trivets project

Simple glue, fabric or napkins & a 4" x 4" porcelain tile, some sealant and you can have some of the cutest places to set a hot pot on.

Snowman face wearing a hat and scarf
Mod podge is such a simple crafting tool and can be so incredibly forgiving when you craft with it.

Please see my coaster tutorial for directions here: mod podge coasters tutorial

The only difference in the making of these is that I don't back the entire surface with peal and stick cork. I usually just glue a little felt on the back so I don't worry about scratching things and call it good. They are already quite sturdy and don't need any extra bulk.

Otherwise, the steps done on a trivet  is identical to the coaster tutorial. 4"x4" is just the right size for a lot of the larger napkins and for having a nice tile on the counter to protect it from heat. 

I love doing seasonal tiles for my own home and keep them on the stove top between uses to give it a little bit of a touch of my style. 

yellow fuzzy ducklings swimming in the reeds
Since plain white ceramic tiles can be bought from most hardware stores for around $5 for a pack of 9 (one square foot)... they can be a really affordable way to get into the crafting basics.

Could you make money???

I really think so - while mod podge allows for great creations and allows you to get a quality result with little effort - more and more crafters are learning about how easy it is and not everyone will be ready to pay for it. But trivets tend to draw more attention and their size makes them a little easier for selling to customers.

For the trivets I have made, I have only spent about $5 for nine tiles, plus around $.50 to $.75 for a napkin (though material, and self-printed items are definitely other options). In 20 minutes (and a month + several days) drying/curing time - I can easily make 9 tiles. I'm sure you could probably make more or make sets of coasters at the same time..

You could save money buy buying things in bulk - the glue, the sponge brushes, the tiles, etc. I do prefer ceramic tiles over wood, because if you are going to be putting hot pans on them, it's nice to know they aren't going to slide around.

Giving yourself a base rate of $15/hour and buying in bulk, you could easily make 9 tiles under $1.50 each. Even if you were to sell them for $5-$10 each, you'd easily make a profit.

Creativity is really your best bet for finding buyers. 

Depending upon how many you make, you can buy seasonal or holiday napkins in a stack for a few bucks but then you will typically end up with about enough napkins to make 40 trivets. Instead, I prefer to buy napkins from resellers on Facebook or through their website so I only have to buy one or two napkins per style. Since they often run sales after the holiday is over, I can often get a couple of napkins for under a $1 and have enough to make 4-8 trivets. 


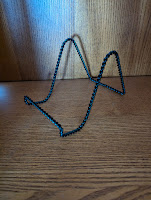
For display options if selling at a table, I would take along a couple of pots from the kitchen to show them in use, have a good sign indicating what they are, how heat durable they are, and the cost. I would also have some sitting on shelves using plate holders. 


While you should display your best items, if at a craft fair you have seasonal or trivets unrelated to seasons front and center, you could also have several off season trivets in storage that people can flip through (like a record shop). The best part of this idea is that you really don't have to unpack these trivets, saving you time at set up.

My latching tote was only a few dollars from Dollar Store. I usually tape an index card to the front for "fall", "Halloween", etc. and store my trivets that way.


Friday, February 16, 2024

Shamrock - Happy St Paddy's Day - wreaths


Can you tell it's a shamrock?
I think so, but every other time I look at it,
I start to doubt myself.

Difficulty level? Very, very easy

Equipment needed: Heavy duty Scissors (will need to be strong enough to cut chenille stems aka pipe cleaners)

Time spent - about two hours

Materials used (Amazon affiliate links, though a lot of these can be bought at Dollar Tree):


* 8 36' packages of mesh tubing - dark green  (dollar tree)

* 2 30' packages of mesh tubing - gold (no longer carried by dollar tree)

* About a dozen green chenille stems

LESSON LEARNED: Most of my supplies were purchased second-hand, the most affordable way to go. The seller was getting out of making wreaths for additional income.

LESSON LEARNED: if you are going to buy 'all that they have' - you need a lot of storage; and you probably don't need "all of it". And you may need to find a market to sell the supplies to. I am unlikely to ever agree to 'buy all of it" again.


This was my first go at making a wreath/hanging art using mesh tubing. It was SUPER easy to use and looks a lot better in person than I expected. It's a little bit addictive.


I like to cut my chenille stems into thirds, but don't cut them all until you know how many you really need. I try to have at least one cut before trying to start to make the bundles.

"Bundles" are a group of tubing that has been cut to size and looped together - that will then be held together with a couple of twists of the chenille stems. I wanted just a bit of gold and all the dark green. But you can mix and match any colors you like with literally any shape that you can find online, at Dollar Tree, or anything you can make yourself.


I added each bundle as I made it using the remaining length of the chenille stem to wrap around the wires for the frame. I made my wreath by using only the center wire going all the way around the frame. And it's incredibly full, so doing more than one wire would make it look quite crowded. I did debate just going around the outside to see if it would create an empty space in the middle of the frame, but liked it the way it was turning out already.

My particular bundles I made with mesh tubing cut to around 24 to 26" long, 3 - 4 stems per bundle and looped around in a 6" length (so about twice in each direction). Once the stem was attached to the frame, most loops ended up being about 3" long.

LESSON LEARNED: I was initially worried about all the ends being visible; and tried to make my ends land in the center so they would be 'caught' by the chenille stem and not be visible on the form. But each bundle took more than twice as long to make. While the finished project did have visible ends, there were only about 8 or so that really stood out as being 'out of place'. I simply trimmed them down after I finished attaching the remaining stems.

LESSON LEARNED: It's very important to make sure that your length is as consistent as possible, but it doesn't have to be extremely exact. I ended up with a 24" cutting mat in front of me that I could quickly use to measure. But because the mesh tubing is stretchy, it was easy to pull it tight and get it cut too short. 

Some of my tubing was pinched or drawn out in places that made it kink or look unpleasant. Most of those are not visible in the final project unless it ended up making your loop too long. Once again, using my scissors, I could cut back anything that was unappealing and no harm, no foul.

I wasn't super happy with the stem of my shamrock. So instead of following the entire outline, I did just the one side and used a full chenille stem to kind of keep the bundles to one side. I felt it helped define the look of the stem better than just looking like another 'clump' of bundles.

I am still debating if I'm going to hot glue a sign, a rainbow and/or a few pieces of plastic gold coins to it, but to be honest? At this point, I'm probably going to leave it as is.  You could always add battery fairy lights and floral stems. But I think it turned out cute as-is.

Could you make money???

Probably not. Mesh wreaths and mesh tubing wreaths are getting harder and harder to sell because a lot of people make them these days and it's harder for yours to stand out. I'm seeing fewer people making these and bringing them to craft shows in the last few years.

I really didn't spend much for this one wreath, but that's because I got enough supplies to make about 200 wreaths for $400. 

Cost of Materials - If you can buy them at dollar tree, you're looking at around $1.25 per item. 12 items $15. The minute you start buying the supplies elsewhere - you're easily looking at around $30-40 for supplies for a single wreath. 

Buying in bulk will make it cheaper. But it's the time that now starts to factor in.

Two hours at paying myself $15/hour is $30. And sellers are having a hard time selling their wreaths for $45 let alone adding in any profit.

Buying in bulk and doing multiples in an assembly line will definitely lower the cost of making them. But you still have to find a market.

They do make great gifts, they make great items for decorating your own homes. And I'm still nagging my friends that I'd like to have a Saturday afternoon where I pull out all of my totes, different wreath frames, mesh and all the floral picks, ribbons, and tools and we all work together to makes wreaths for each of us to take one home. 

Mod Podged Trivets project

Simple glue, fabric or napkins & a 4" x 4" porcelain tile, some sealant and you can have some of the cutest places to set a ho...